Zapier Infusionsoft By Keap Direct Mail Integration
Our Zapier Infusionsoft by Keap Direct Mail Integration makes it super easy to send automated postcards and letters to your audience with Postalytics. Your sales and marketing team can now trigger personalized direct mail through Infusionsoft.
The setup is easy, and then, even the least tech savvy people will be able to trigger personalized and tracked direct mail pieces. Infusionsoft by Keap offers a menu of event triggers through Zapier that can be used to send direct mail through Postalytics. Here are the available triggers today:
- style="box-sizing: inherit; -webkit-tap-highlight-color: transparent; list-style-type: disc;">Add a new contact
- New Contact Action (Task, note, or appointment)
- Tag Added to Contact **(Most Popular with Postalytics)**
- New Expense
- New Invoice
- New Opportunity
- New Payment
- New Subscription
- New Action Sequence
- New Affiliate
- Credit Card Charge
- New Company
- New Invoice
- New Tag
- New Product
- New Subscription Plan
Note: “Tag Added to Contact” is the most popular Infusionsoft Trigger due to its versatility. You can integrate this option with your Infusionsoft Automations or simply add a tag to a contact when you want to send them mail. Within your automations, you can set your rules or conditions, then have a tag added to the contact when those conditions are met. This will then trigger your Zapier Postalytics integration. This could look like something like this:

There are no minimums with Postalytics so start firing off those mailers!
Essentially, Zapier acts as the intermediary between Infusionsoft and Postalytics. Zapier is the easy to use, yet powerful integration platform that both Infusionsoft and Postalytics have written interfaces to. In order to use the Zapier Infusionsoft direct mail integration, you’ll need to do a little setup in each of the tools. Once it is setup, the Zapier Infusionsoft direct mail integration will run for as long as you have Postalytics Drip Campaign Credits available.
Step 1: Set up a “Triggered Drip” campaign in Postalytics using the Zapier Action method
Postalytics Triggered Drip Campaigns are the revolutionary new way that individual mail pieces can be automatically sent to Infusionsoft Contacts. Setting up the campaign involves creating a postcard or letter template, proofing it, and using the Postalytics Triggered Drip Campaign wizard. When you setup your Triggered Drip campaign, be sure to choose the Zapier Integration at the beginning of the process.
Follow the “Step One” instructions from the link below, and simply replace “Boingnet” with “Infusionsoft by Keap”:
How To Setup The Send Direct Mail Zapier Action
Step 2: Create a “Tag” in Infusionsoft for triggering Direct Mail
- Click on Contacts from the menu on the left
- Choose a contact
- Click on Tag

Next, add a new Tag and click Save:

If your Keap/Infusionsoft account does not have a “State” field already setup
Note: Older versions of Infusionsoft do not have ‘State’ as a standard field, which is needed for standard USPS addressing. You will be required to create State as a custom field and then fill it in for every Postalytics direct mail recipient.
From Settings, choose App Settings
Set up Custom fields for: Contact and click Go
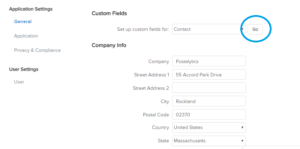
click Add, then create a Custom Text Field called State
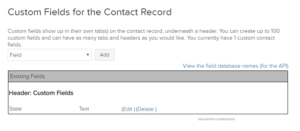
You will now find the field ‘State’ in all of your contact details. The finished product should look like this.

Step 3: Creating your Zapier “Zap” between Infusionsoft and Postalytics
The Infusionsoft Trigger
1. Login to your Zapier Account and click Make A Zap!
2. Choose Infusionsoft by Keap from the directory for your Trigger.
3. Choose “Tag Added To Contact” as the Infusionsoft Trigger and click Continue.
4. Connect to your Infusionsoft account and Continue.
5. Choose the Customized Tag Added and click Continue

Test your new Trigger and click Continue
The Postalytics Send Direct Mail Piece Action
Next, you’ll need to setup the Postalytics Send Direct Mail Piece action within your Zapier account.
Choose Postalytics from the directory for your Action.
Choose Send and Track a Postcard or Letter as your Action.
Connect to your Postalytics account by entering your Username and Password.
Under Set Up Template, map the sample Contact that you have added a tag for from your Infusionsoft Account to the Postalytics campaign.
Zapier will pull from an existing Contact in your Infusionsoft database to assist with your mapping. Triggered Drip Campaign, First name, Last Name, Address, City, State and Zip are all required. It should look something like this:
Now you can Finish and Turn Your Zap On. Congrats, you are now able use the Zapier Infusionsoft direct mail integration with Postalytics!
Step 4: Test your Zap in Zapier, Postalytics and Infusionsoft
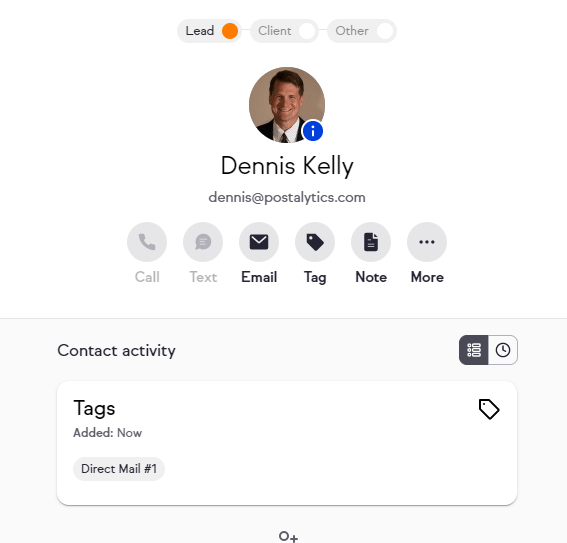
Time to Test! Here’s how you will trigger a Direct Mail piece from within Infusionsoft
1. Go to Contacts>Choose a Contact for your test
2. Click Tag
3. Choose the Tag associated with your Zapier Postalytics campaign
The Infusionsoft Contact View
At this point Zapier has done a test and you have done a test, so your campaign should have an audience of 2. If you test more contacts, this will increase. You can check the status of the Zap by going to the Zapier dashboard and clicking ‘Task History’. You should see your test like the sample below:

Now go back to Postalytics and visit the dashboard for the new campaign. You’ll access some tools at the top of the dashboard:

Click the ‘Preview Created Mail’ and you will get a popup showing each piece of mail that has been generated. Since you are in test mode by default, this will show you all test mode postcards/letters (none of them are actually sent).
If you flip the mail to live mode, this will show live mail that has actually been sent to the printer.

You should be ready to flip the switch and go live. You’ll need to turn on your Zap in Zapier, and flip your Triggered Drip Campaign to Live Mode. You’ll be able to use the send direct mail Zapier Action for as long as you fund your Triggered Drip campaign with credits.
Note #1: You can flip between “Test” and “Live” modes as many times as necessary.
Note #2: If you need to edit your template, your campaign must be in Test Mode. We recommend pausing your Zap and your CRM triggering activity while editing your template. All must be turned back to “Live” when you’re finished editing/proofing your template.