Zapier’s powerful workflow tool allows you to create “Zaps” that are “Triggers” and “Actions” between different Apps in their App directory.
For Postalytics, the most common Zapier use case is the Postalytics Action to ‘Send and Track a Postcard or Letter’. With a little bit of setup, you’ll be able to use the Postalytics Triggered Drip Campaigns to send and track individual pieces of mail when your CRM, Marketing Automation or other applications trigger that action through Zapier.
Create a Triggered Drip Campaign in Postalytics
You will need to have a Triggered Drip Campaign created in Postalytics before you can continue to create your Zap. This will identify which mail piece you will be sending through your Postalytics Action ‘Send and Track a Postcard or Letter’. After, this will allow you to map your Triggering App data to Postalytics Mail Data.
To walk through the full step by step instructions on how to create a Triggered Drip Campaign in Postalytics, read this article.
Login to Zapier and Create a Zap
Login to your Zapier account and select “MAKE A ZAP”.

The following screen is where you’ll choose a Trigger with an App Event.

The App Event is what kicks off your Zap in Zapier. You can choose from a wide variety of CRM’s, Marketing Automation systems, Email Marketing systems, e-Commerce systems and more.
Boingnet is a lightweight marketing tool with a 60 day free trial. We’ll choose a Boingnet “New Contact Added” Event as an example. Every App within the Zapier directory has its own menu of Triggers and Actions, so your experience will vary slightly when you choose your CRM or other tool.

Click ‘Connect Account’ and login to your Boingnet (or other CRM/system) account. Once logged in, choose the account and click continue.

This Trigger step is instructing Zapier to send the data over to your Action Step when a new contact is added to Boingnet. Once the Postalytics Action is created, the data is received by Postalytics and the mail piece will be created and sent out.
The final step of creating this App Event selection is to “Test Your Trigger”. In this case, Zapier will find a recent contact that has met your Trigger criteria, “New Contact Added”. This step is mandatory as this test contact will be used to map your data to Postalytics for sending mail.
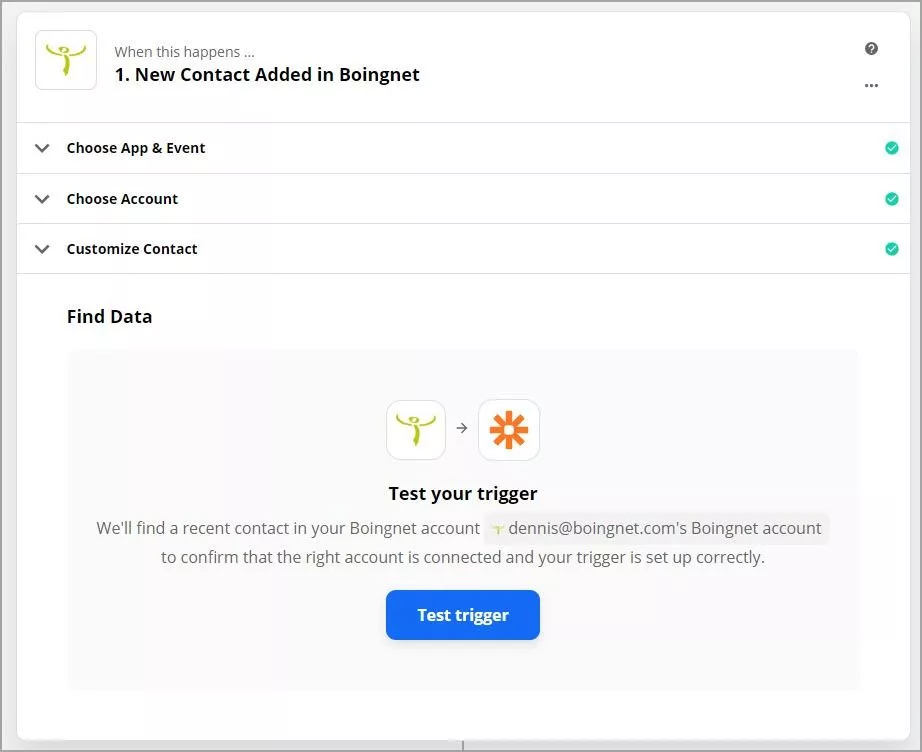
View the test data, and make sure you’re contact has a full name and/or company name and a postal mailing address (address, city, state and zip code).
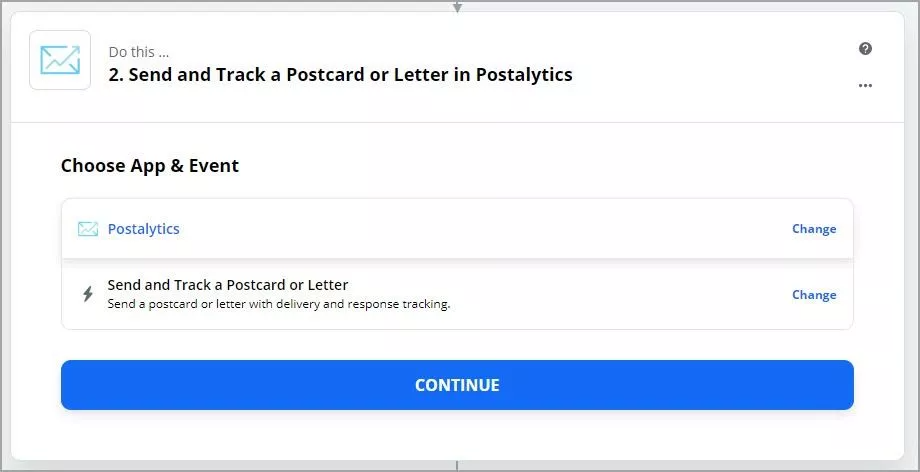
Next, set up the action by searching for Postalytics as the Action App. Your only action choice will be ‘Send and Track a Postcard or Letter’.
Click 'Continue' and select your Postalytics account (one Zapier account can work with multiple Postalytics accounts), and then click continue.
Next, you’ll need to choose your Postalytics Triggered Drip Campaign, then map the incoming fields from Boingnet from your test contact to the outgoing fields that will be sent to Postalytics. Map all of the required fields, as well as any Custom fields you may have used for variable personalization in your mail piece and/or landing pages.

Your Zap is now ready to test through Zapier. This is an important step and shouldn’t be skipped. Postalytics Triggered Drip Campaigns default to “Test Mode” when created, so your test mail will not be sent out. If all went well, you should see the screen below:

You can now turn on your Zap and run a complete Zapier Triggered Drip Test, between your CRM/other system and your Postalytics Triggered Drip Campaign.
Test your Zap in Zapier, Postalytics and your other app
Go to your Boingnet account (or other CRM/Trigger tool), open the list you chose for your trigger and add a new contact (or create the trigger based off of your specific workflow). Be sure that all of the required fields are included. Click save to send the trigger through Zapier. Note: there may be a delay of up to 15 minutes for a Zap Trigger to reach Postalytics.

You can check the status of the Zap by going to the Zapier dashboard and clicking the Task History tab. You’ll then see your test in the Task History log as shown below:

In the Postalytics app, visit the dashboard for your Triggered Drip Campaign, in Test Mode. You should see Total Valid Contacts of at least one, more if you tested additional contacts. You can test as many times as you like while in Test Mode, and you don’t have to worry about sending mail or using credits.
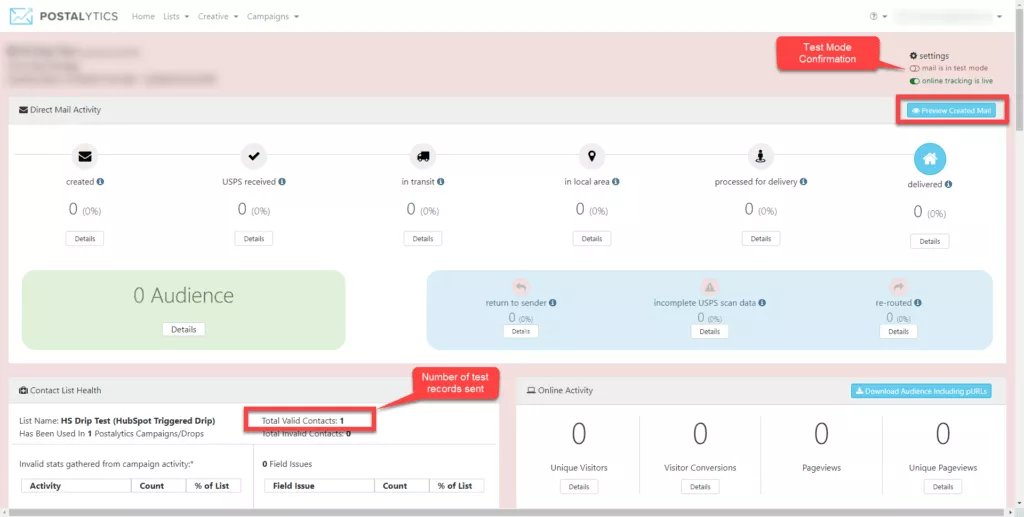
When you trigger mail to your campaign in Test Mode, it will generate a PDF that you can easily review.
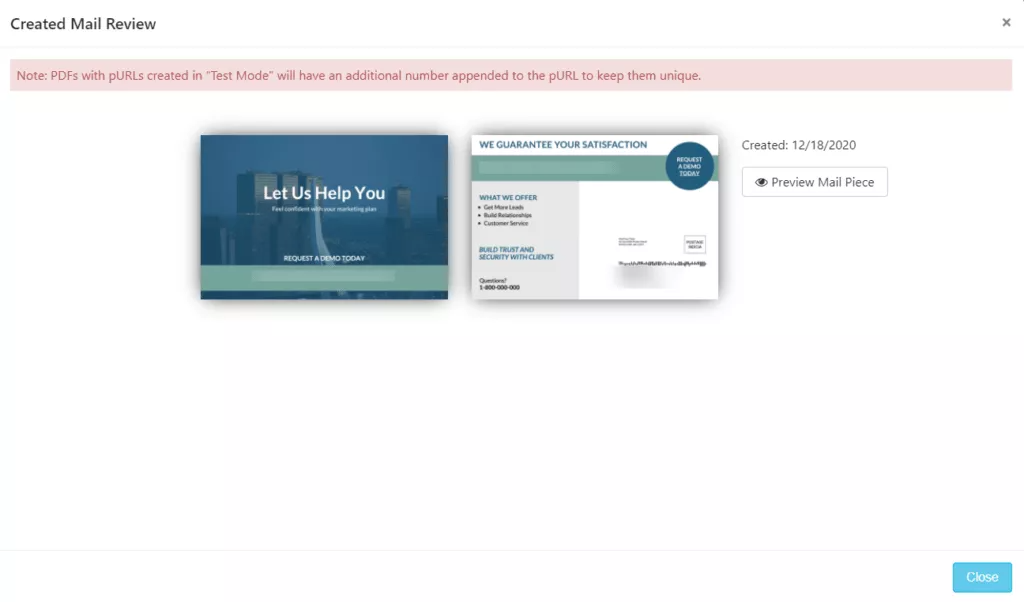
Click “Preview Created Mail”. A popup window will appear with PDF’s of each of the mailpieces generated for your test records. Remember that since you are in test mode, none of these pieces have actually been sent to the printer. The PDF is exactly what gets created in a “Live” campaign, including any personalization driven by your data. It simply just does not get printed and mailed. However, once your campaign has been toggled to “Live Mode” and your triggers are coming through, clicking “Preview Created Mail” will show live mail that has actually been sent to the printer.
When you’re happy with the results, make sure your Zap is on and then you can flip your Postalytics Triggered Drip campaign to Live Mode, and purchase Direct Mail Credits, if needed.
To Turn Your Campaign “Live” You Need Credits
Before your campaign can be turned live, you’ll need to have at least 100 Direct Mail credits for the format that you’ve chosen. (By format, we mean the creative format/postage combination, such as 4×6 First Class, 6×9 Standard, or Custom Envelopes). If you already have credits, your campaign will seamlessly turn live.
If you don’t have at least 100 credits, you’ll need to purchase them. A pop up window will appear when you use the toggle to switch to live mode from the Campaign Dashboard, if you do not have enough credits. Select “Purchase Credits Now” and proceed with the steps to purchase credits.


Once live, your campaign will “listen” for your Zapier Zap, and send the postcard or letter you’ve chosen to each recipient with no further interaction. You can just sit back and relax while the campaigns keep rolling along.
Learn How To Use Postalytics Status Codes Via Zapier
You can also set up a Zap to receive Postalytics Status Codes back for use in other workflows, automations and processes. Learn more about it in our help doc “Use Postalytics Status Codes via Zapier”.