Smart Send Direct Mail Campaigns allow you to design and launch a direct mail broadcast campaign from a single place. You can track offline delivery and online response activity at the campaign level all the way down to the individual. You can also personalize your tracked landing pages for a unique experience.
The Smart Send Direct Mail Campaigns Wizard
The Smart Send Direct Mail Campaigns Wizard walks you through the entire process, step by step, to create a Smart Send campaign. You won’t be able to move to the next step until the current one is completed with all required fields.
At any point during the process you can click on 'Save For Later'. This allows you to come back to the draft campaign and pick up where you left off at a later time.
How Do I create a Smart Send Campaign?
From the Home Page, or main navigation bar, click 'Campaigns', then 'New Campaign' from the drop down menu, and finally, 'Smart Send'. You will automatically navigate to the Smart Send Direct Mail Campaigns Wizard.

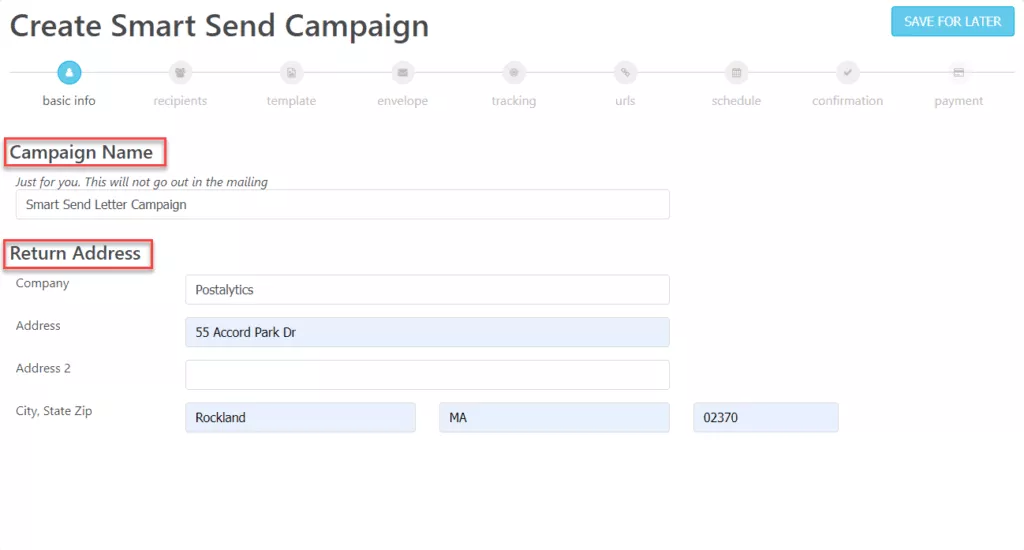
Basic Information
Enter in the Campaign Name and Return Address that will be printed on the mailpiece. The Return Address is populated from your profile, but you have the ability to change it here for this mailpiece. Click 'Next' to continue.
Recipients*
Smart Send Direct Mail Campaigns are based off of lists that have been imported into Postalytics. Select the country that you will be mailing in – either United States or Canada – from the first drop down menu.
*Mailings to the United States and Canada cannot be combined. Each will need to have it’s own Smart Send Campaign set up.
Next, select your Direct Mail List from the second drop down. You can choose from lists uploaded from Excel or .CSV files, or from lists imported from your CRM. If there is Variable Data or Logic in the template, the data in this list will be used. Click 'Next' to continue.

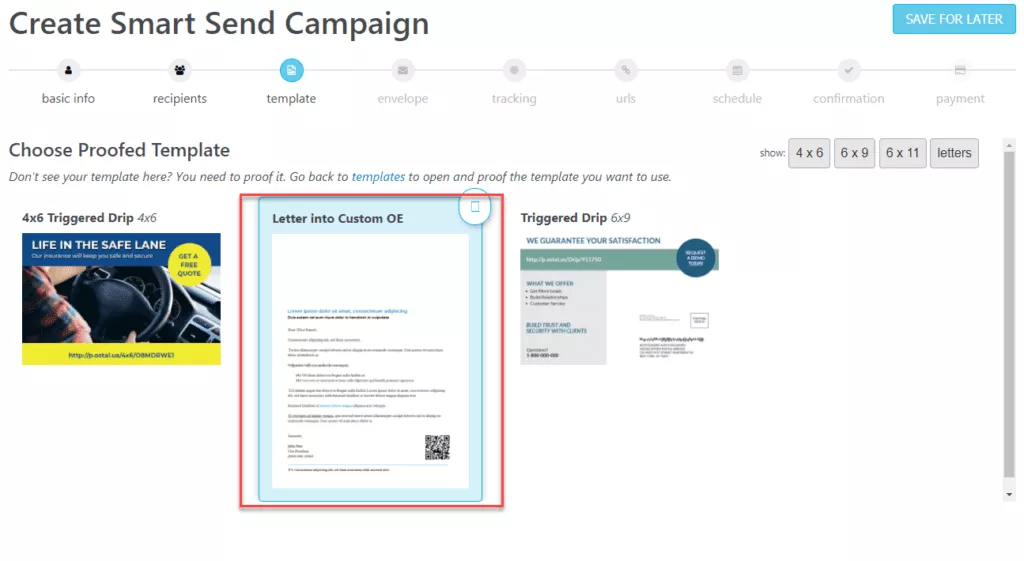
Template
Before you can use a template in a Postalytics campaign, it must be “Proofed”. This means that you’ve accepted the way that your template has been constructed, and you’ve checked your personalization, pURLs, images, etc. If you do not see your template here, you’ll need to proof it. Click 'Save For Later' and go back to the template library to proof the desired template. If your template has been proofed and is shown here, select that template to be used in the campaign, and click 'Next' to continue.
If the template chosen was a letter, you'll have the option to select a standard double window, or a custom single window outer envelope. Follow the same steps above, including Proofing if you do not see your desired envelope template here. Click 'Next' to continue.
Note: Your custom envelope order will need to be finalized before you can select it. Orders take 3-6 weeks to process, and made available to use in a campaign. Any pending orders will be listed in the bottom section of the envelope page.
For more information on the Custom Envelope order process click here.
If you selected a postcard or self mailer template, then this step will be skipped in the Campaign Wizard.

Audience Tracking
Postalytics tracking lets you optionally use pURLS and/or QR codes on your mailpieces that redirect your recipients to any landing page you specify. If the template you chose has a pURL or QR code in it, you’ll be brought to this step. If your template does not include a pURL or QR, you’ll skip this step.
Domain
You need to Choose Your Domain for tracking. You can use Postalytics shared Free Domain (p.ostal.us) or a Vanity Domain. Visit our Vanity Domains page for more information on purchasing one through the Postalytics Domain tool.
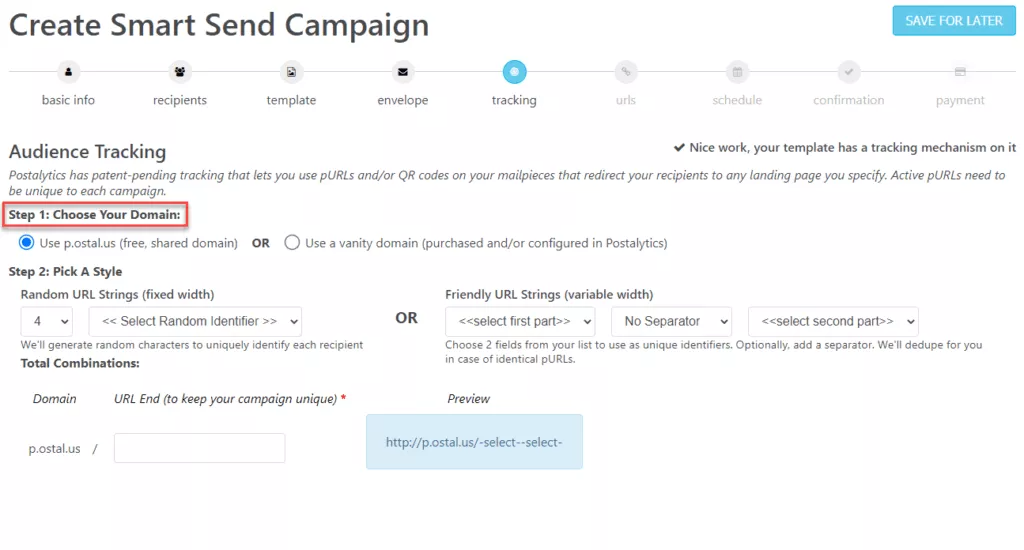
URL Style
You’ll then Pick A Style for the URL string. Postalytics offers two very different pURL formats – Random and Friendly URL Strings.
Random URL Strings will generate randomly selected letters, numbers or both for you. You choose the length of the character string. Use Random Strings when data privacy or fixed domain length are primary concerns.
Friendly URL Strings are chosen from the data fields in the contact list you’ve chosen for the campaign. In order to create uniqueness, you’ll need to choose two data fields. Most clients choose First Name/Last Name, in order to maximize the personalization of the creative. The length of the URL will vary based on the data in the contact list. The separator between first and last identifier is optional. If you choose first name and last name as your identifiers, then your pURLs will have the following format: FirstNameLastName.yourdomain.com
Finally, enter the URL end you wish to use in the URL end box. For example, you might want to use the name of the promotion or the date as the URL end. Any combination of letters and numbers will work, just don’t use special characters or symbols in your URL name. Using a URL end will prevent you from creating duplicate pURLs if you plan to use your domain for multiple campaigns. A preview of your pURL format will be displayed to the right, in the blue box.
NOTE: If the domain selected has been used before and the ending URL is not unique, you’ll receive a system message asking you to change the structure before you’re able to move forward.

After your Audience Tracking is configured, click 'Next' to continue.
URLS
A Starting URL is where you’d like your audience directed to when they enter their pURL or scan their QR code. This URL can be any site that has the Postalytics tracking code installed.
You also may choose to set an optional Goal URL that is referenced in the campaign wizard. Once this goal URL is reached it will indicate a conversion. Thank you page URLs are commonly used. The Postalytics tracking code will also need to be installed on this page.
The starting URL and Goal URL must have the complete URL address (e.g. https://postalytics.com).

After your URLs are completed, click 'Next' to continue.
Schedule – US Campaigns
In this step, you can pick a date for when the campaign will be sent to the Print Delivery Network as well as the Postage Type for your campaign. You can select today or a future date for the campaign. Please note that it will take 5-7 business days to be delivered via USPS First Class Mail and 14-21 business days for USPS Standard Mail delivery.
Depending on your format (there is no standard class for 4×6 postcards), you can toggle between the First Class and Standard Postage types to see the difference in the Estimated Cost and Estimated In-Home Dates.
Daily cut-off times are 9am ET each day; anything submitted after that will be considered the next business day within the print network. Production days are based on normal business days, including National Holidays.
Delivery Tracking will begin as soon as the mail pieces enter the USPS tracking system.

Schedule – Canadian Campaigns
In this step, you can pick a date for when the campaign will be sent to the Print Delivery Network. You can select today or a future date for the campaign. To the right, you’ll be able to view the Estimated Delivery Dates, based on your selection.
Daily cut-off times are 9am ET each day; anything submitted after that will be considered the next business day within the print network. Production days are based on normal business days, including National Holidays.
Please note that it will take 2 business days to address, print and deliver the mail to the Canada Post.
For Campaigns mailing in Canada, Delivery Tracking is not available. You will receive print status and hand off to the Canada Post updates, as well as any online activity that happens from your pURL and/or QR Code after delivery.

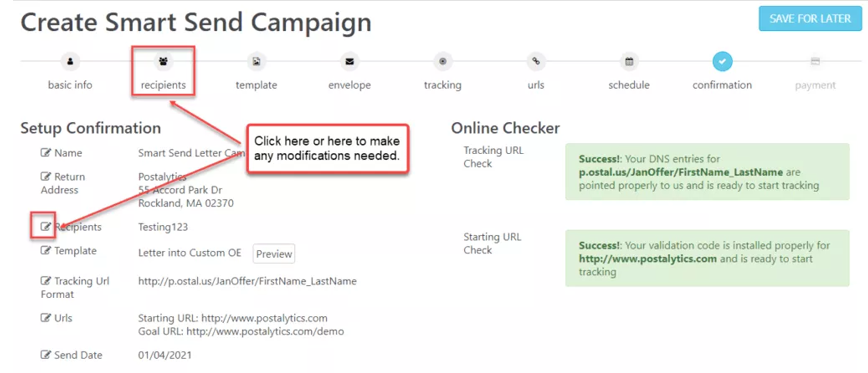
Confirmation
This is your final review of the campaign details. You can go back to any section to make adjustments by clicking on the Pen and Pad edit icon next to the step, or by clicking the section in the header. Please review carefully as this is the final step.
As a safeguard to ensure the proper creative template is being used in the campaign, you’re required to check off that the template selected in the third step of the campaign wizard is correct. This step cannot be bypassed here, so please be sure to click on “Review Mail” and then check the box in order to move forward in the campaign creation.
To download the preview PDF, right click to "Save As" and download. This can be used for any internal reviews or approvals, or simply saved for your records.

If you’ve included a pURL in your campaign, we’ll perform checks to determine if your domain is properly set up and if the Postalytics Tracking Code is properly installed on your Starting URL landing page. The areas in the Online Checker will be green with a message of “Success!” if everything is configured properly.

If either, or both of these aren’t configured properly, the box will be red, with an “Error” message. The Next button will also be disabled until they are corrected. If this is the case, please refer to the Domains and Tracking Code help articles for more information.

After you’ve reviewed and confirmed that all of the campaign details are correct, click Next to continue.
Payment
This is the final step in creating your Smart Send Campaign. The Payment Order Summary outlines the current list quantity, unit cost, and total amount. Although you are now selecting your payment option at this step, you will NOT be charged until your campaign is sent to the Print Network on the day you selected. Note: the quantity you will be charged is for the total number of valid addresses, after processing.
There are three payment options:
- Pay with the credit card on file
- Enter a new credit card
- Use Direct Mail Credits
Credit Card
Select 'Use my credit card', or enter a new credit card in the section directly under Payment Method.

Direct Mail Credits
If you’ve already pre-purchased Direct Mail Credits for this format and postage, select this option from the center section.

If you’d like to use Direct Mail Credits, but do not have them pre-purchased, click the purchase link in the red shaded box. Note: if you are purchasing credits at this point, you’ll need to start over once you’ve purchased the credits, as the campaign will not be saved.

You can also purchase credits ahead of time through the Direct Mail Credit option under your username.

To do this, navigate to the Direct Mail Credits page, where you will select the correct format and postage option for the campaign you are purchasing credits for:
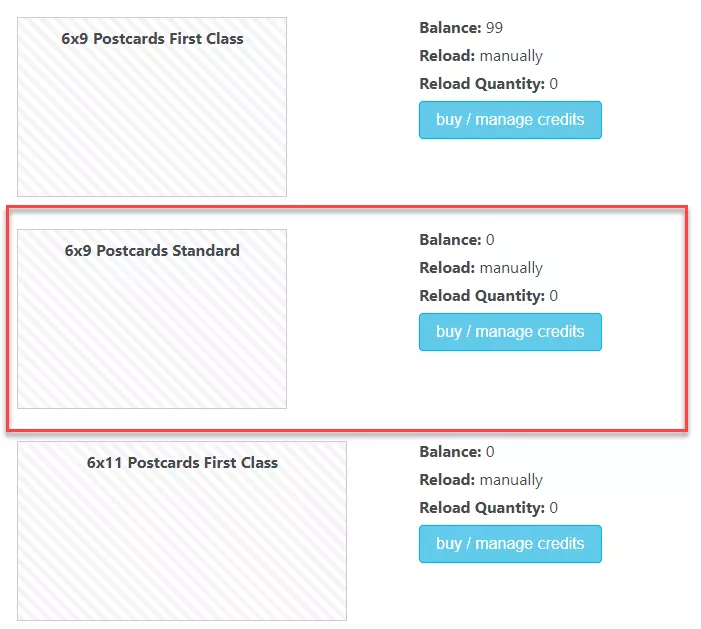
Click 'buy / manage credits' and you’ll be taken to the page where you can select your preferred reload option (see more details below), enter the number of credits you’d like to purchase (minimum of 100), and click 'Update and Buy New Credits Now'.
Automatic Or Manual Credit Reloading
You can choose to have your credits reload automatically once the balance reaches 10%, or manually. If you choose the manual option, you will be notified by email when the balance is at 50%, 20%, 10%, and 5%.
Many customers choose to automatically reorder credits so that there’s no delay in processing their campaigns.

Once the order page is completed, you’ll be directed to the Checkout page, where you can review the order and billing information. Once confirmed, click 'Submit Order'.
After you’ve chosen your payment type, click 'Approve Payment and Create Campaign Now'.
What's Next…
Now that your campaign has been created and scheduled there are just a couple more items to finalize.
If you used pURLs for tracking, they’re being created, which can take a few minutes for large lists. Once the pURLs have been generated, they’ll be live and can be tested.
Review Your Generated Postcards Or Letters
You can generate a high resolution PDF of each piece of mail that you’ve created within minutes of creating your campaign. Just visit your Campaign Dashboard and select the “Preview Created Mail” button, as outlined in this help article.
Note: because Postalytics is fully automated, there is only a very short window to cancel a campaign that is scheduled for the same day. For this reason, we highly recommend that you double check your creative templates and proofs before the campaign is finalized.
Smart Send Direct Mail Campaigns Settings Page
Visit your Smart Send Direct Mail campaigns settings page, where your can:
Set up notifications to go out when your mail delivery status changes and/or when goal conversions take place.
Manage the “Live or Test Mode” status of your online tracking. Statistics gathered in Test Mode can be cleared out prior to the campaign going live.
Copy the Postalytics tracking code to insert in your landing pages (if not already completed). This is very important to ensure offline to online tracking.
Go to Postalytics Tracking Code Overview article. (Note, if your campaign has yet to be fully processed, this may not be available yet). You can also copy and paste the Tracking Code by visiting the Integrations page under your user name).

Access the Variable Data and Logic Assistants – you can personalize your landing pages with data from your campaign with our easy to use tools. These widgets will assist in creating personalized landing page experiences on your own site.
Learn more from the Postalytics Landing Page Personalization Options article.

Postalytics Smart Send Direct Mail Campaigns are the most modern, integrated and powerful way to send list based, traditional direct mail. To learn more about trigger based, CRM driven direct mail, check out our Triggered Drip Campaign Help Doc.